
Introduction
The Platform API provides a RESTful interface for administrators and server-side back-ends to manage their ChatKitty applications.
Headers
Making a request to the Platform API requires HTTP Content-Type and Authorization headers.
Most resources exposed by the API are represented as JSON HAL responses.
For these resources, set request Content-Type headers to application/json.
ChatKitty's API requires a OAuth 2.0 Bearer access token Authorization header values
to access protected resources. A valid access token can be retrieved from the ChatKitty Authorization Service
using your application's client ID and client secret.
Authentication
To authorize use this replacing
acmewith your client ID andacmesecretwith your client secret:
curl --location --request POST 'https://authorization.chatkitty.com/oauth/token' \
--user 'acme:acmesecret' \
--form 'grant_type=client_credentials' \
--form 'username=acme' \
--form 'password=acmesecret'
POST /oauth/token HTTP/1.1
Host: https://authorization.chatkitty.com/oauth/token
Authorization: Basic YWNtZTphY21lc2VjcmV0Content-Type: multipart/form-data; boundary=----WebKitFormBoundary7MA4YWxkTrZu0gW

----WebKitFormBoundary7MA4YWxkTrZu0gW
Content-Disposition: form-data; name="grant_type"

client_credentials
----WebKitFormBoundary7MA4YWxkTrZu0gW
Content-Disposition: form-data; name="username"

acme
----WebKitFormBoundary7MA4YWxkTrZu0gW
Content-Disposition: form-data; name="password"

acmesecret
----WebKitFormBoundary7MA4YWxkTrZu0gW
import requests

url = "https://authorization.chatkitty.com/oauth/token"

payload = {'grant_type': 'client_credentials',
'username': 'acme',
'password': 'acmesecret'}

response = requests.request("POST", url, data = payload, auth=('acme', 'acmesecret'))
Returns a JSON response with the Bearer access token.
{
  "access_token": "d4327889-26a8-49ac-997c-56d8b1bcb09c",
  "token_type": "bearer",
  "expires_in": 42892,
  "scope": "org:1:app"
}
access_tokenis the bearer access token.expires_inrepresents the access token's validity in seconds.
Retrieve an OAuth 2.0 Bearer access token with the client credentials OAuth flow.
Retrieving a Bearer access token requires a ChatKitty application client ID and client secret.
You can create a ChatKitty application and receive client credentials by contacting us.
ChatKitty expects a valid Bearer access token to be included in all API requests like this:
Authorization: Bearer {{access_token}}
Pagination
This requests a user resource page
curl --location --request GET '{{users_url}}' \
--header 'Content-Type: application/json' \
--header 'Authorization: Bearer {{access_token}}'
GET / HTTP/1.1
Host: {{users_url}}
Content-Type: application/json
Authorization: {{access_token}}
import requests

url = "https://staging-api.chatkitty.com/v1/applications/2/users?page=0&size=20"

headers = {
  'Content-Type': 'application/json',
  'Authorization': 'Bearer {{access_token}}'
}

response = requests.request("GET", url, headers=headers)
The command above returns a user page HAL resource.
{
  "_embedded": {
    "users": [
      {
        "id": 1,
        "name": "1017562554",
        "displayName": "Jane Doe",
        "_links": {
          "self": {
            "href": "https://api.chatkitty.com/v1/applications/1/users/1"
          },
          "channels": {
            "href": "https://api.chatkitty.com/v1/applications/1/users/1/channels"
          },
          "application": {
            "href": "https://api.chatkitty.com/v1/applications/1"
          }
        }
      },
      {
        "id": 2,
        "name": "102746681",
        "displayName": "John Doe",
        "_links": {
          "self": {
            "href": "https://api.chatkitty.com/v1/applications/1/users/2"
          },
          "channels": {
            "href": "https://api.chatkitty.com/v1/applications/1/users/2/channels"
          },
          "application": {
            "href": "https://api.chatkitty.com/v1/applications/1"
          }
        }
      }
    ]
  },
  "_links": {
    "first": {
      "href": "https://api.chatkitty.com/v1/applications/1/users?page=0&size=2"
    },
    "prev": {
      "href": "https://api.chatkitty.com/v1/applications/1/users?page=0&size=2"
    },
    "self": {
      "href": "https://api.chatkitty.com/v1/applications/1/users?page=1&size=2"
    },
    "next": {
      "href": "https://api.chatkitty.com/v1/applications/1/users?page=2&size=2"
    },
    "last": {
      "href": "https://api.chatkitty.com/v1/applications/1/users?page=2&size=2"
    }
  },
  "page": {
    "size": 2,
    "totalElements": 6,
    "totalPages": 3,
    "number": 1
  }
}
ChatKitty paginates all collection resources. Requesting a resource collection returns the first page of the collection optionally with HAL hypermedia links to subsequent pages if more pages are available.
Traverse the page links to iterate through a collection.
Properties
| Name | Type | Description |
|---|---|---|
| page | PageMetadata | Metadata about the page |
HAL links
| Link | Methods | Description |
|---|---|---|
| self | GET | Self link to this page. |
| first | GET | Optional: Link to the first page of this collection. Present if known. |
| prev | GET | Optional: Link to the previous page of this collection. Present if there are more items before the first item in this page. |
| next | GET | Optional: Link to the next page of this collection. Present if there are more items after the last item in this page. |
| last | GET | Optional: Link to the last page of this collection. Present if known. |
Embedded properties
A page resources embeds a slice of a resource collection in a JSON array property with the same name
as the resource collection. For example, with a collection of users resources, the resource collection name would be users,
and the page would include a JSON array in its _embedded property named users, as per the HAL specification.
usersis the name of a user resource collection
{
  "_embedded": {
    "users": [
      {
        "id": 1,
        "name": "1017562554",
        "displayName": "Jane Doe",
        "_links": {
          "self": {
            "href": "https://api.chatkitty.com/v1/applications/1/users/1"
          },
          "channels": {
            "href": "https://api.chatkitty.com/v1/applications/1/users/1/channels"
          },
          "application": {
            "href": "https://api.chatkitty.com/v1/applications/1"
          }
        }
      },
      // ...
    ]
  },
  // ...
}
Page Metadata
Metadata about a page containing its size, total number of elements in the collection, total number of pages in the collection, and the page number.
Properties
| Name | Type | Description |
|---|---|---|
| size | Int | The number of elements in this page. |
| number | Int | Optional: The zero-based index of this page. Present if known. |
| totalElements | Long | Optional: The total number of elements in the collection. Present if known. |
| totalPages | Int | Optional: The total number of pages in the collection. Present if known. |
Chat Functions
ChatKitty provides Chat Functions, serverless cloud functions that allow you to define custom logic for complex tasks like user authentication, and respond to chat events that happen within your application.
Chat Functions let you write arbitrary code that runs any time a relevant event or action happens inside your app. You can send push notifications, create emails or make HTTP calls to your backend, as well as use a pre-initialized server-side ChatKitty SDK to make changes to your application in response to user actions.
Defining a chat function
You can define chat functions from the "Functions" page of your ChatKitty application dashboard.

Every chat function has two input parameters, an event that triggered the chat function call with event data, and a context containing chat function and application specific data and helper objects, including pre-initialized ChatKitty Platform API clients.
Only events of a specific corresponding type can trigger a chat function. These types are referenced
to as trigger types. For example, whenever a user receives a ChatKitty notification,
a UserReceivedNotificationEvent
event is created. If you've defined a chat function with its corresponding trigger type, "User
Received Notification", then the chat functions get called with the
created UserReceivedNotificationEvent.
Chat functions automatically run when an event of their trigger type occurs.
Your Chat Runtime
Your chat runtime provides the environment your chat functions run. This includes a pre-initialized ChatKitty Server-side SDK, dependency NPM modules, environment variables and custom code that executes before each function.
You can use any NPM package inside your Chat Functions as a Chat Runtime dependency.
Adding a chat runtime dependency
To add a chat runtime dependency, from your ChatKitty application dashboard, go to the "Functions" page:
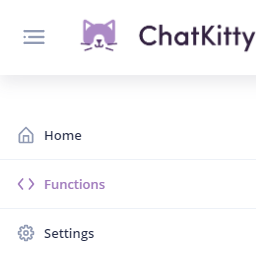
Then from the "Functions" page, go to the "Runtime" tab:
From the "Runtime" tab you can add a new dependency using the name of the NPM package you want to install and the version of the package you want to install.
For example, installing version 7.24.0
of the Firebase NPM package
looks like this:

Using the package name firebase and the package version 7.24.0.
An equivalent npm command for this would be npm install firebase@7.24.0.
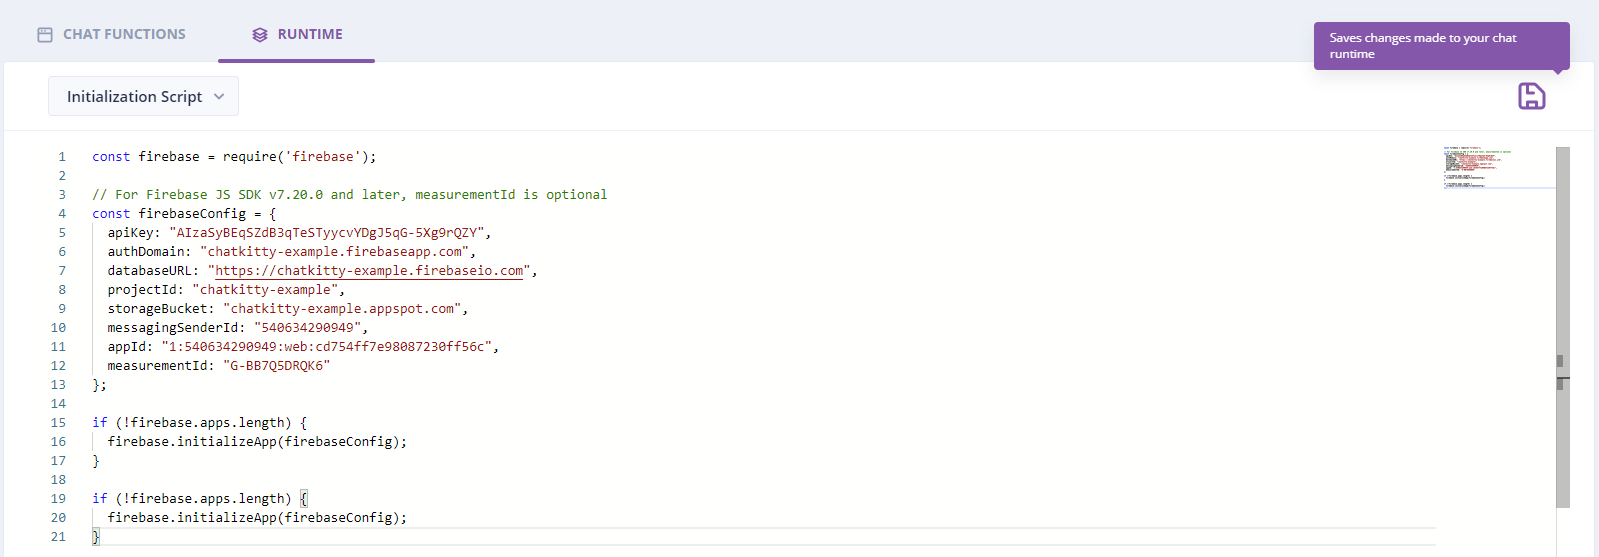
Adding a chat runtime initialization script
If you need to run initialization logic before running your chat function, you can add arbitrary code using a chat runtime initialization script.
To add an initialization script, from the "Runtime" tab of the "Functions" page, click the dropdown and select "Initialization Script".
Blocking and non-blocking chat functions
A chat function can be blocking or non-blocking, depending on its trigger type.
Blocking chat functions run synchronously before an action related to your ChatKitty application, and can be used to modify the behavior of your application.
Non-blocking chat functions run after an action related to your ChatKitty application happens, and can be used to include additional functionality or integrate an external system with your ChatKitty application.
Blocking chat function types
User attempted start session
This function is triggered when a user attempts to connect to ChatKitty, starting a new
user chat session. Inside this function you can define custom logic to authenticate the user,
check their credentials, create the user's ChatKitty profile or hook into your own backend. This
function get passed in the username of the user attempting to start a session, and any
authentication parameters you include client-side using the authParams property.
Non-blocking chat function types
User received notification
This function is triggered after a chat event a user should be notified about, (like a message sent in a channel they belong into, or a reaction on their message) occurs. Inside this function you can define custom logic to notify the user of the event that occurred (for example using an email sender or push notification service). This function get passed in the user that received the notification, the notification received, and a boolean true if the user is currently online.
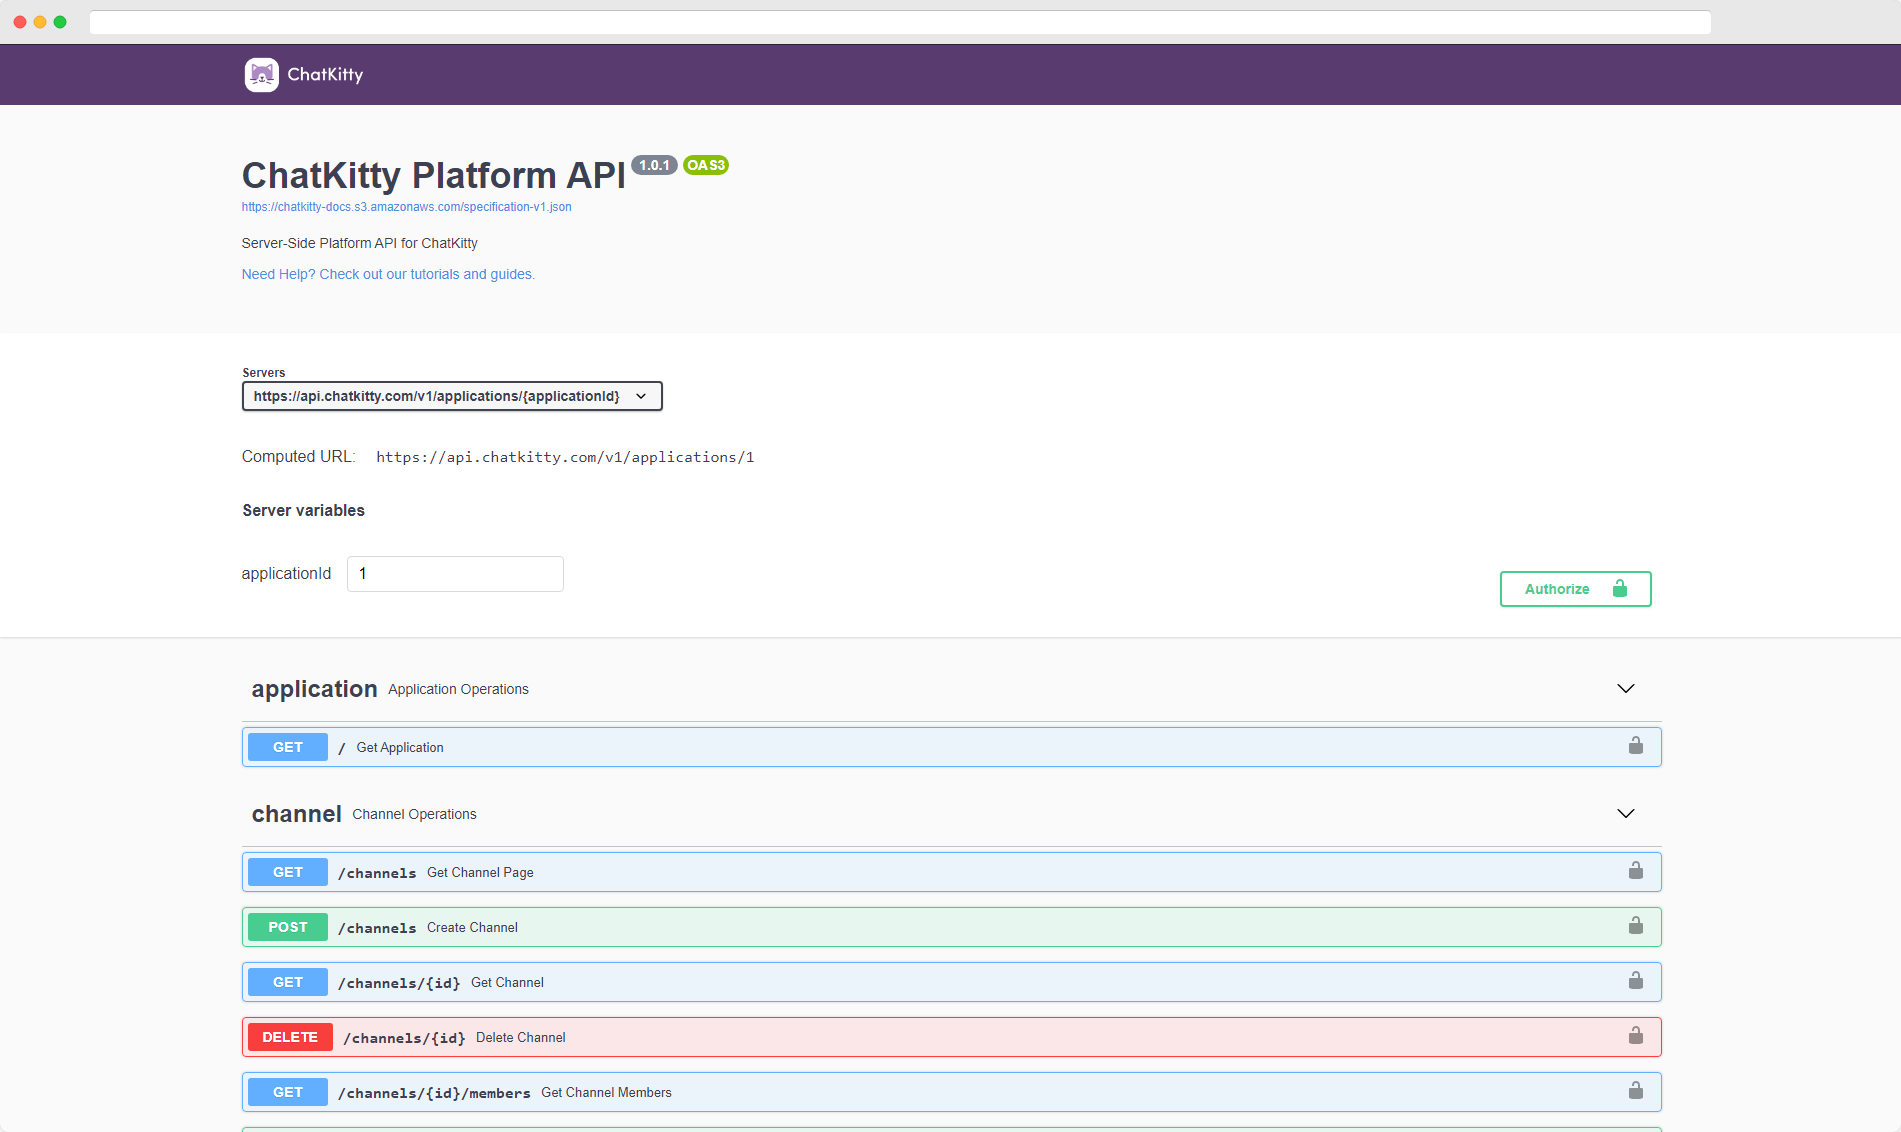
Open API Documentation
ChatKitty provides an Open API specification of its API endpoints and objects.
Files
Files like pictures, videos, documents, etc. can be uploaded to ChatKitty. If you prefer hosting your own files, you can also create external file references pointing to your file servers.
Properties
| Name | Type | Description |
|---|---|---|
| type | Enum | The type of this file. Possible values are HOSTED and EXTERNAL |
| url | String | URL pointing to this file's content |
| name | String | The name of this file |
| contentType | String | MIME type of this file |
| size | Long | 64 bit integer size of this file in bytes |
File Uploads
The HTTP request for a file upload looks like this:
curl --location --request POST 'https://api.chatkitty.com/v1/file-upload-path' \
--header 'Content-Type: multipart/form-data' \
--header 'Authorization: Bearer {{access_token}}' \
--form 'file=@./file-path/file_name.png' \
--form 'extraPropertyName=extraPropertyValue'
POST / HTTP/1.1
Host: https://api.chatkitty.com/v1/file-upload-path
Content-Type: multipart/form-data; boundary=Your_Boundary_String

Your_Unique_Boundary_String
Content-Disposition: form-data; name="file"; filename="./file-path/file_name.png"
Content-Type: image/png

(file data)
New_Boundary_String
Content-Disposition: form-data; name="extraPropertyName"

extraPropertyValue
Your_Unique_Boundary_String
To upload a file to ChatKitty, make a multipart form data POST request to a file upload endpoint:
- Your HTTP request content type header must be set to
multipart/form-data. - The content-disposition header for the part containing the file content must have
a "name" parameter with the value
file. - The form data must be the content of the file.
Additional file upload properties
- Additional properties specific to the file upload endpoint can be sent using additional content parts
- The content-disposition header for the part containing the property must have a "name" parameter with the property name.
- The form data must be the value of the property.
External Files
If you'd rather host your own files, you can create an external file reference.
To create an external file reference, set the external file's parameters on the file property of an endpoint expecting an external file reference:
External File Parameters
| Parameter | Type | Description |
|---|---|---|
| url | String | External URL pointing to this file's content |
| name | String | The name of this file |
| contentType | String | MIME type of this file |
| size | Long | 64 bit integer size of this file in bytes |
Errors
The ChatKitty Platform API uses the following error codes:
| Error Code | Meaning |
|---|---|
| 400 | Bad Request -- Your request is invalid. |
| 401 | Unauthorized -- Your API key is wrong. |
| 403 | Forbidden -- The resource requested is hidden for administrators only. |
| 404 | Not Found -- The specified resource could not be found. |
| 405 | Method Not Allowed -- You tried to access a resource with an invalid method. |
| 406 | Not Acceptable -- You requested a format that isn't json. |
| 410 | Gone -- The resource requested has been removed from our servers. |
| 429 | Too Many Requests -- You're making too many requests. |
| 500 | Internal Server Error -- We had a problem with our server. Try again later. |
| 503 | Service Unavailable -- We're temporarily offline for maintenance. Please try again later. |